10.2.12


3.2.12


1.2.12
Little Bear Bread Recipe

Kuma-chan Pan (Little Bear Bread)
200g Bread Flour
10g Sugar
3g Salt
60g Water
60g Milk
10g Butter
1/2 Teaspoon Dry Yeast
1. Warm the milk to just below boiling in a heavy pan. Place the flour and salt into the bowl. Add the milk, lukewarm water, sugar, and yeast. Combine into a smooth dough.
2. Knead the butter into the bread and form a ball. Allow to rise in a warm place until doubled in size.
3. (Just noting how much the dough should double via the picture)
4. Place the dough on a rolling mat. Cut off one gram and divide it into 20 pieces for the ears. Divide the rest of the dough into 10 pieces. Allow them to rest for 15 to 20 minutes on a damp tea towel.

5. Gently dampen the dough all around. Lightly press the two ears each onto the head. (The dough is easier to handle when slightly damp.)

6. Gather up the sides of a tea towel to form channels, placing the dough inside the channels, and allow it to rise until doubled in size once again.

7. If you don’t have a tea towel instead, place the dough on parchment paper-lined cookie sheet. (If you don’t have paper, spray it with water.) Cover loosely with plastic wrap as it rises. (For baking, you’ll be using the paper-lined cookie sheet)
8. For Brown Bears – Preheat the oven to 220 C, lower to 190 C and bake for 15-20 minutes.
For White Bears – Preheat the oven to 190 C, lower to 160 for the first 10 minutes, then lower 130 for the last 5-10 minutes.

(Know that ovens and bake times will vary)
Draw on the face with a food coloring marker.
via: happy rainbow★
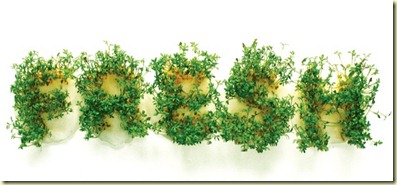
Grow the alphabet
This is a great idea to get your kiddos interested in gardening and spelling and its something that can be done now, indoors while its still to cold for outdoor gardening.

salt & nectar - The Blog - Guest Post: Teach your Toddler the Alphabet with Seeds!
Fern @ Life on the Balcony
How to Grow the Alphabet
Supplies
salt & nectar - The Blog - Guest Post: Teach your Toddler the Alphabet with Seeds!
Fern @ Life on the Balcony
How to Grow the Alphabet
Supplies
- Small, inexpensive pot
- A few cups of potting soil
- Seeds (kitty grass, wheat grass, regular lawn-type grass, or chives all work really well)
- Alphabet-shaped cookie cutters
- Fill your pot with soil to about 1 inch below the top of the pot. Tamp the soil down with your hands.
- Place the desired letter on top of the soil in the pot.
- Sprinkle the seeds inside the letter only. You should use the entire seed packet so that the area inside the cookie cutter is pretty densely and evenly covered with seeds.
- Remove the cookie cutter and sprinkle soil on top of the seeds so that they are covered with about ¼ to ½ inch of soil.
- Gently water, trying to disturb the soil as little as possible.
- Place in a warm, sunny spot and keep the pot well watered
31.1.12
What we are reading January week 4
This book takes it one day at a time. It gives activities for manners that might need special or extra practice. And I learned about Tussie mussies; talking bouquets. I’ll post more on that later.
My daughter loves the Pinkalicious series, we all love the art and story line of All the world, and yes my oldest “S” is still into trains. A Guide to trains was given to him by his older (18 year old) cousin Joe. the story goes- Joe was thrift store hunting when he came across this book and thought it would be a nice birthday gift for “S”. His birthday was still a month away at this time. So nice and thoughtful, right. Well on a visit to Aunt Liz’s house “S” found the book and no one had the heart to deny that boy his book. So he got an early birthday gift. Six months later and it’s still his go to book for quiet time.


Click on each picture for purchase info, better yet check your local library.
Julie Morstad — Products
I like to browse art with my kids. I like watching there faces examine a piece and listen to their interpretation of what it’s all about. Sometimes its simple “look mama there eating/sleeping/playing” and other times their interpretation leads to whole stories and ignites an imaginative story that I can’t even keep up with. Its these times that I wish I had a insta-record button on my life. The following art work my Julie Morstad produced such a moment.
My boys really liked this one and they told me the boys were playing and seeing who could be the tallest. I was told the boy with the flag won and that the boys fighting are going to get in trouble and have their lunches taken away and have to sit on their hands till their moms and dads came to get them. Oh and no treat from the teacher that day too.
{print. unknown medium} “games”
My daughter told me the girls are tired from cleaning dishes and that their mommy must drink a lot of coffee.
{print. unknown medium} “gluttony”
This one had all them begging me to take them kite flying. It took me almost an hour to explain that we had to wait till the weather warmed up. My oldest “S” wants to fly the “eagle” my second boy “J” wants to fly the fish and my daughter “T” of course wants to fly the butterfly then I was told that my youngest “W’ and I can have the dragonfly. “See mom we all get to fly kites!” When I asked what daddy would fly, I was told that daddy would be to busy getting the kites unstuck from the trees. Lucky Daddy.
{ink, pencil, gouache and collage on paper} “how to make a kite”
julie morstad
http://juliemorstad.bigcartel.com/
found via http://www.juliemorstad.com/
My boys really liked this one and they told me the boys were playing and seeing who could be the tallest. I was told the boy with the flag won and that the boys fighting are going to get in trouble and have their lunches taken away and have to sit on their hands till their moms and dads came to get them. Oh and no treat from the teacher that day too.
{print. unknown medium} “games”
My daughter told me the girls are tired from cleaning dishes and that their mommy must drink a lot of coffee.
{print. unknown medium} “gluttony”
This one had all them begging me to take them kite flying. It took me almost an hour to explain that we had to wait till the weather warmed up. My oldest “S” wants to fly the “eagle” my second boy “J” wants to fly the fish and my daughter “T” of course wants to fly the butterfly then I was told that my youngest “W’ and I can have the dragonfly. “See mom we all get to fly kites!” When I asked what daddy would fly, I was told that daddy would be to busy getting the kites unstuck from the trees. Lucky Daddy.
{ink, pencil, gouache and collage on paper} “how to make a kite”
julie morstad
http://juliemorstad.bigcartel.com/
found via http://www.juliemorstad.com/
30.1.12
Martha Stewart's Crafts for Kids: Rock Crafts - Martha Stewart


Whenever I sit down to plan a craft with my kids I need the craft to meet three key points. 1. Is it easy enough for a 2 year old to do with minimum help (this ensures less tears and more smiles) 2. Are the materials cheap and easy to find (my life is crazy enough without having to search for weeks for ten .25cm gold brads which only come in packs of 100 and cost $50..uhh, no thanks) and finally 3. will the craft result in something we will all like to see displayed proudly around the house. These rock crafts fit the bill wonderfully.
Martha Stewart's Crafts for Kids: Rock Crafts - Martha Stewart
25.1.12


2.12.11


16.10.11
Shadduck Park Stroller Strides
Stroller Strides: Coeur d' Alene

Contact: Kate Pratt
Phone: (800) 390-6043
Email: katepratt@strollerstrides.net
Your first week of classes with Stroller Strides of Coeur d'Alene and Post Falls are FREE! So come out and join us!
Stroller Strides is not just a walk in the park! Stroller Strides is a great way to get in shape, meet other moms, and have fun with your baby. Classes are designed for all fitness levels and are taught by nationally certified instructors, who are also moms. Each class is 60 minutes and consists of power walking or jogging with intervals of body toning. We welcome babies as young as 6 weeks. All strollers, except umbrella strollers, will work fine for workouts.
In addition to a great workout, you can meet some amazing new moms and kids. Our program also offers our Luna Mom Playgroup (at no additional cost) that consists of weekly playgroups after class, monthly moms night out activities and special community events. Click on our Luna Mom Playgroup above to see what is planned this month. Don't put it off any longer... come join all the Stroller Strides fun!
What To Bring To Class
Water Bottle
Mat or Towel
Sturdy Stroller (does not need to be a jogging stroller)
Sunscreen for you and your little one, if applicable
Bundle your little one up on our cold days
Mondays
9:00 AM - 10:00 AM
Wednesdays
9:00 AM - 10:00 AM


Subscribe to:
Posts (Atom)